Virus lab, Biosafety level 2 core facility at BioClinicum
OnkPat/Theme Cancer core facilities are available for staff at the Department of Oncology-Pathology in addition to research Theme Cancer in BioClinicum. New users need an introduction to get authorized. Contact information to responsible persons can be found below. Before using this core facility send your certificate from KI laboratory safety introduction to Paula Mannström. Access to the building is also required.
General information
Room nr: U230 06 2910
Responsible persons: Libuse Janská and Zana Brilej
The virus lab is accessible for authorized persons to work with microorganisms in risk class 2, please visit the biosafety website at KI’s staff portal for information. Each research group needs a special permit for the use of specific microorganisms approved by the Swedish Work Environment Authority (Arbetsmiljöverket). For the permit, a risk assessment has to be done and a dedicated form needs to be filled in. If you need more information about the risk assessment and the form, contact the biosafety delegate for OnkPat: Paula Mannström.
New users with approved permits can contact the person responsible for the room to receive a short introduction to the routines used in this facility to become an authorized user and be added to the booking calendar.
Work procedures in the GMM-L room
- Only personnel that have retrieved the appropriate training can work in the room.
- Before you start working in the room make sure you are aware of current guidelines (should be dated).
- Each new project needs to have an approved application for “Anmälan av ny GMM-användning” (Ask Paula Mannström about how to apply for this).
- Using sharp objects while working in the room including glass pipettes, syringes and scalpels is not allowed. Plastic pipettes are ok.
- You may book the security benches through Calira/Clustermarket
- After finished work, sign in the logbook by the security bench, close the biohazard bag and put it in the yellow bin and clean the bench with Ytdes Plus.
Access to the GMM-L room
Work with microorganisms is recognized by the use of specific labels "Biosafety Level 2" ("skyddsnivå 2") at the entrance. Biosafety Level 2 (BSL2) is appropriate when work is performed with most microorganisms that can cause disease in humans. It is the lowest biosafety level for work involving human pathogens. Only certified personnel can work in the laboratory. Working in the GMM-L room is restricted to persons who have received personal instructions from one of the contact persons Libuse Janská or Zana Brilej. Everyone working in a lab must know the specifics of the GMM-L material used including routes of transmission, how to handle GMM-L material in a safe way and understand the associated health hazards. The group leader/PI is responsible that the person working with viruses knows the hazards, follows the safety instructions and have been introduced how to work in the GMM-L room.
Signing up, starting work, finishing work
Sign up in the logbook every time you use the GMM-L room. You may book time in for the sterile benches in the room through the booking system. When you go into the lab always put on lab gown and gloves. Gloves and a personal lab gown are required to be worn in the room. The lab gown used in the GMM room should only be used in the GMM room and should be stored in the anteroom for the GMM room. Only approved gloves for virus work may be used (Please use the extra length orange gloves labeled EN374-2:2003 level 3, virus resistant). It is also recommended to use safety goggles to protect from accidental splashes in the eyes, especially during procedures that take place outside the microbiological safety cabinet class II (MSC II).
The microbiological safety cabinets in the virus labs in BioClinicum are connected to the ventilation and therefore it is possible to use chemicals in these. In general, if you need to perform chemical work in a microbiological safety cabinet, please consult personnel responsible prior to your work. There should also be a label on the microbiological cabinet confirming this. After finished work, sign in the logbook by the security bench, close the biohazard bag and put it in the yellow bin and clean the bench with Ytdes Plus.
Before you leave the room, take off your gloves and put them in the bag for solid waste (see below). Close both doors when going in or out of the room. The space (anteroom) between the two doors (buffer zone) should be kept clean, and should never be directly exposed to contaminated material from the GMM room. Always wash your hands when passing the buffer zone.
Decontamination and waste handling
Everything needs to be decontaminated as described in the instructions for waste handling.
Tissue culture procedures
Follow standard cell culture procedures with the addition of the safety steps required for working in a GMM room. Work very carefully and avoid spilling. Only use tips with filter (aerosol-barrier tips). Do not use any glassware or sharps to minimize the risk of cutting. Dispose cell culture waste according to instructions (see below). After use clean the hood work surface with disinfectant for surfaces DAX Plus or similar. Cells stored in the cell incubator should be logged on the list on the front of the incubator and plates should be clearly labeled with name and date. Cell culture consumables (plastics, such as plastic pipettes, tips, culture dishes etc.) may be stored in the GMM lab on the shelf space in a clearly labeled box. Unlabeled material left on the bench or cell incubator areas may be removed and disposed.
Lysing cells
To avoid the risk of cutting only use plastic cell culture material. Working with needles, knives, scissors or scalpels is not allowed. To store virus containing solutions or virus use the -20°C freezer in the GMM room. Virus-producing cells should be lysed to homogeneity using lysis buffer in the virus lab (no viable virus particles may leave the laboratory). Lysates from virus producing packing cells, or live packing cells, may not be taken out of the GMM room. Lysates from infected cells (non-pack cell lines) should be prepared using SDS containing lysis buffer (RIPA) or Trizol. Put cell lysates into screw-cap tubes. Spin down the lysates in the bench-top centrifuge in the GMM room. After transferring supernatants into new tubes, you may take them out of the lab.
Transferring transduced cells out of the GMM room
Before bringing generated stable cell lines out from the GMM room they should be tested that no recombination has occurred and replication competent virus have thus not formed. To do this collect follow the protocol “Testing for replication competent virus”.
Cell counting and centrifugation
Use the ordinary cell counting chamber to count virus-producing or virus-treated cells in the GMM room. After counting, clean the cell counting chamber with disinfection and rinse with water. When centrifuging virus-containing medium use only tubes with screw caps.
Summary
- Liquid waste should always be placed in a sealable container (conical tube, old cell media flask, white canister) before placed into the yellow waste box.
- All solid waste that can be firmly closed (e.g. cell culture flasks) should be placed directly into the yellow waste box.
- Other solid waste (e.g. plates, plastic pipettes) should be placed in the orange plastic bag marked BIOHAZARD. After finished work for the day, seal the bag and place it in the yellow waste box.
- Used tips are collected in empty flasks and or white canisters placed in the yellow waste box. Do not leave consumables in hood!
- You may NOT pour any liquid waste in the sink in the GMM room or directly in the yellow waste box.
- When full, the yellow waste boxes should be properly sealed and labeled with “Smittförande avfall” and put in the recycling room for pick up.
Solid waste
Burnable infected and non-infected material including plastic pipettes, tips, etc., should be put in plastic bag and then placed inside the yellow waste box. This includes plastic pipettes, tips, tubes, cell culture flasks, petri dishes, gloves, tissue papers, etc., after removal of liquids. A safe way to work is to have a use the orange plastic bag marked BIOHAZARD for solid waste that can be sealed within the cabinet, which is then placed in the yellow box after finished work. All solid waste that can be firmly closed (e.g. cell culture flasks) may be placed directly into the yellow waste box. When the yellow box is filled up, close the lid and contact virus room responsible that will help you to discard the waste. Alternatively, you may dispose a full yellow waste box after you have properly sealed it and correctly labeled it as waste containing “Smittförande avfall”. Plan your work in a way to minimize the amount of waste.
Homogenous liquid waste
Cell media, virus stocks and solutions that you do not need anymore should be collected into a sealable plastic container in the hood and then disposed into the yellow waste box.
Special cases: Hazardous chemical waste
Hazardous chemical reagents are referred from use in the GMM room. If usage is required, please consult thepersonnel responsible for the virus lab before use.
Glass bottles and metal containers
Used empty glass bottles and metal containers should be autoclaved and washed within the virus lab. Then they can be removed.
Lab gowns
You need to collect and wear a designated lab gown that is only used when you are inside the virus lab. The lab gown can be stored in the aft room until your work in room is completed, then it should be returned to the room for used gowns. Abandoned lab gown will be purged on a regular basis. They are changed in the usual way if they are not contaminated with spilled virus material. Take care of lab gowns contaminated with spilled virus according to the procedure described below.
If your lab gown has been contaminated, take it off, treat the spill with Virkon, and put the lab gown in a plastic bag. Seal the bag and label it that it contains a virus contaminated lab gown. Leave the bag in the GMM room. Thereafter contact the virus room responsible as soon as possible about the contaminated gown. Thereafter it can be sent away as common laundry.
Spill
If you have spilled virus-containing liquid on the bench, on the floor or in the microbial safety cabinet. First leave the room to avoid breading in aerosol that may have formed during the spill. Then cover the spill with absorbent, either tissues or Vermiculit. Deactivate the virus by adding Virkon on the absorbent. Instructions for how to use Virkon and preparation of Virkon (For tablets, use one tablet with 500 ml water. For bags, use one bag with 1000 ml water). Wait for a while to let the solution deactivate the virus. Throw the material used for the cleanup in a plastic bag, seal the bag and thereafter throw the bag in the yellow waste box. Never let the cleaning staff decontaminate! They do not have the expertise required.
Exposure
If you for some reason get exposed to virus we suggest following similar procedures, as you would have been exposed to blood. The description below is based on “Stick- och skärskador samt inom vården” (Puncture- and cutting related injuries including blood exposure in health care). Please keep in mind that you should not use any sharp and cutting objects (needles, scalpels, glass pipette) when working in the room.
If something of the following occurs please follow these procedures immediately.
- If you spilled on your skin.
- Wash first with soap and water and dry the skin
- Wash and disinfect with 70% ethanol or an alcohol containing wash solution.
- If you splashed virus contain solution in your eye, mouth or an open wound.
- Rinse liberally with water or physical salt solution (PBS or NaCl-solution). There is an eye washer in the room attached to the facet. Make sure you know how to use it.
- If you have a puncture related exposure (you cut yourself with an object that contain virus):
- Do not try to press out blood from the wound.
- Rinse liberally with water or physical salt solution (PBS or NaCl-solution).
- Disinfect with 70% ethanol or an alcohol containing wash solution.
After you have rinsed and disinfected the wound you need to report the incident to GMM-room responsible personnel and your supervisor in a timely manner. Also, you need to file a report in KI incident reporting system (IA-system).
If you have any questions or suggestions regarding GMM-L room procedures, please contact one of the responsible persons for the GMM-L room Libuse Janská or Zana Brilej.
In case of severe major accident or pollution, injuries and similar emergencies call 112.
The general routines in BioClinicum and the Karolinska Hospital for chemical spills, personal accidents and fires apply to the virus lab as well.
In case of larger accidents, the department always has to be notified
Ola Larsson, Head of Department, work: 08-524 812 28, mobile: 073-953 9394
Chair person for work environment at OnkPat:
Paula Mannström, 070-278 2961
Responsible for work environment in BioClincium:
Minor accidents, spills or improper use of chemicals: Contact Thomas Fritze for consultation: Thomas.fritze@stenarecycling.se , 010–445 64 81 (office hours), 070–560 75 17 (after office hours)
Also, notify Paula Mannström.
For further medical counselling, you may also contact Avonova Solna (occupational health service for KI employees), stockholmcity@avonova.se, or at 08-120 125 00 Monday to Thursday 8:00-17:00, Fridays 8:00-16:30, closed for lunch 12:00-13:00.
Testing for replication competent virus
Purpose: After you have generated stable cell lines by virus transduction you need to test that the generated cell line is not producing a replication competent virus.
Precondition: Generate a stable cell line by virus transduction according to suitable protocol. Select the cells with suitable antibiotic selection marker. Perform several passages and washes of the cells (at least 3 washes during 72 hours). Then follow the protocol below to test for replication competent virus.
Generate conditioned media from stable cell line: Seed the generated cell line at a density that will allow for growth during 3 days without changing media. The recommended volumes are 2 ml media for a 6-well plate and 10 ml media for a 10 cm dish. Generate conditioned media by incubating the cells in the same media for 72 hours. This incubation time allows for production of potentially formed replication competent virus. Collect the conditioned media after the 72-hour incitation time and sterile filter the solution. Save the conditioned media for the experiment described below. Notice that if you wish to save time, the time point “day 2” should coincide with the 72 hour time point of the conditioned media production (see below).
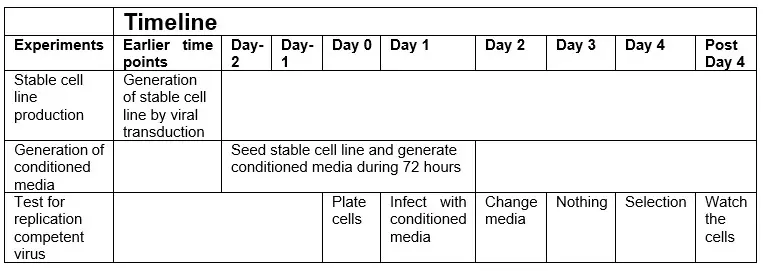
Day 0
- Plate the original target cells, or other cells that are easy to infect and do not carry antibiotic resistance, at a suitable density.
Day 1
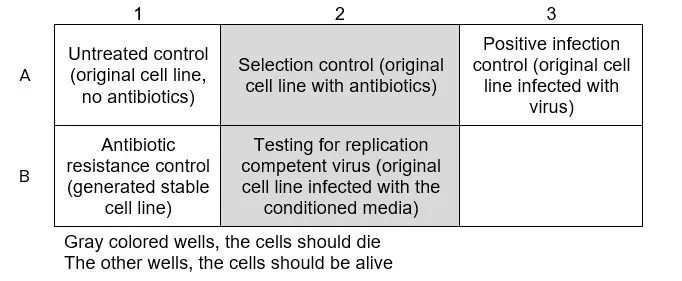
- Infect the cells with the collected conditioned media in as similar fashion as during the original transduction (The conditioned media should be used in a similar manner as the original virus containing media used during the original transduction). Well B2 in figure below.
- Produce one positive infection control by infecting the cells with a solution that previously have been confirmed to contain virus (The virus should be the same type of virus, ideally the same batch, as used for the generation of the stable cell line). Well A3 in figure below.
- Leave two wells untreated, one as a positive and one as a negative control for the antibiotic selection. Wells A1 and A2 in figure below.
- Seed one well with the generated cell line as a positive control for antibiotic resistance. Well B1 in figure below.
Required wells:
- Untreated control (to control that the cells managed to stay alive during the experiment, do not add antibiotic selection to this well)
- Selection control (to make sure the antibiotic selection works)
- Positive infection control (infect with real virus to make sure the infection procedure worked and induce antibiotic resistance)
- Conditioned media from generated cell lines (amount of wells will depend on the previous experiment).
Day 2: Change media on the infected cells
Day 3: Nothing
Day 4: Start antibiotic selection
Add antibiotic selection at the same concentration as used during the original drug selection to the cells infected with the conditioned media, the cells infected with the original virus and the positive control. Remember,do not add antibiotic selection to the untreated control well.
Post Day 4:
- Watch the cells under drug selection for the time required (depends on antibiotic selection marker used.
- The cells should start to die in the selection control well and in the well for testing of replication competent virus.
When the cells are dead, the original generated cell lines may be removed from virus lab
a. Death of the cells means that the drug resistant vector in the original infected cells didn’t reach the cells infected with the conditioned media and thus no replication competent virus has formed.
b. If the cells that were infected with conditioned media do not die from the antibiotic selection it means that replication competent virus has formed and the generated stable cells needs to be discarded.